Setting Up Active Directory in a Home Lab
Week 2 of 10 — Active Directory Setup
The Goal for Week 2
Week 1 produced a stable, isolated network with two machines that could communicate reliably. That foundation matters now, because everything in Week 2 depends on it.
Active Directory is the identity backbone of most enterprise environments. Before users can log in, before devices can be managed, before policies can be applied — there has to be a directory. This week was about building that directory from scratch: installing the role, promoting the server to a Domain Controller, designing the organisational structure, creating users and groups, and finally joining the client machine to the domain.
The decisions made here — how to name things, how to structure the hierarchy, which options to configure and which to deliberately skip — matter as much as the steps themselves. This post explains both.
Step 1: Installing Active Directory Domain Services
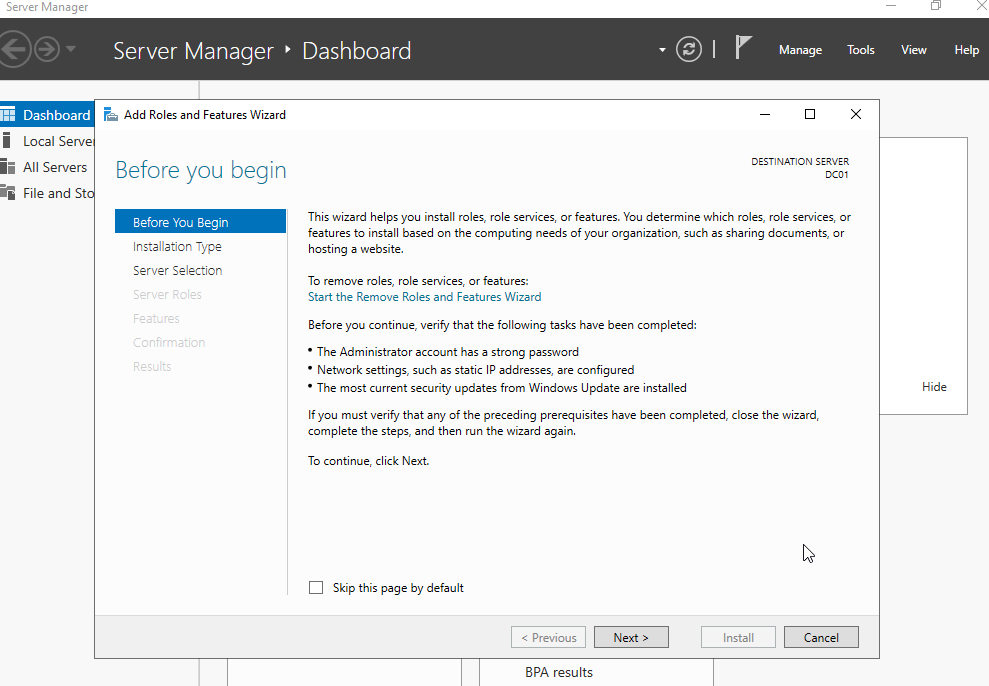
The first decision was where to start. Active Directory Domain Services is a server role, which means it gets installed through Server Manager before any configuration takes place. The installation does not make the server a Domain Controller — it simply adds the capability. Promotion comes later, and keeping those two stages separate is important because it means you can verify the role installed cleanly before committing to the promotion.
In Server Manager, I opened the Add Roles and Features Wizard on DC01.
When Active Directory Domain Services is selected, Windows prompts to add a set of required management tools alongside it — Group Policy Management, the AD DS and AD LDS tools, the Active Directory module for PowerShell, and the AD DS snap-ins.
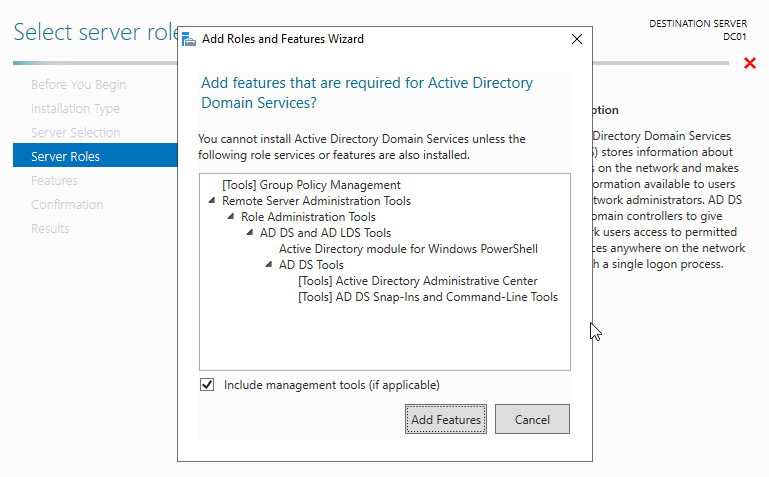
These tools are not optional extras. They are how you manage the domain once it exists. Accepting them at this stage keeps everything in one place.
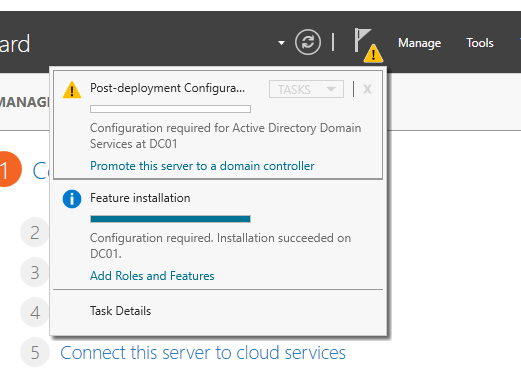
Step 2: Promoting the Server to a Domain Controller
Once the role was installed, Server Manager flagged a post-deployment task: the server needed to be promoted to a Domain Controller.
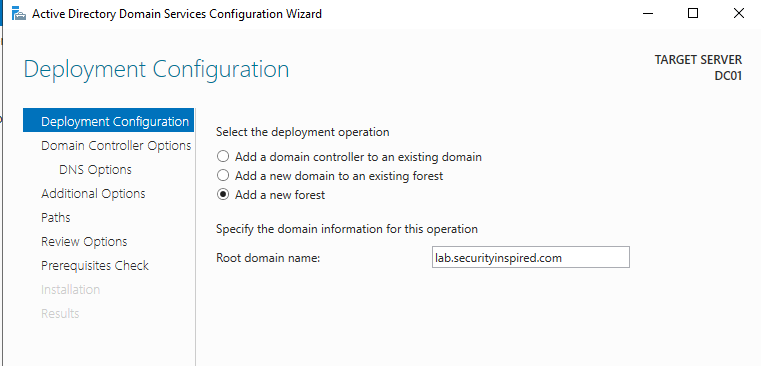
This is the step that actually creates the domain. Before clicking through, there was a structural decision to make: what to call it.
I used lab.securityinspired.com as the root domain name. The lab. subdomain prefix is deliberate — it keeps this environment clearly separated from any production or public-facing context, which matters if the domain name ever overlaps with something real.
The wizard runs a prerequisites check before allowing installation to proceed. This is worth paying attention to — it flags warnings about DNS delegation and cryptography settings that are expected in a standalone lab environment but would need addressing in a production context.
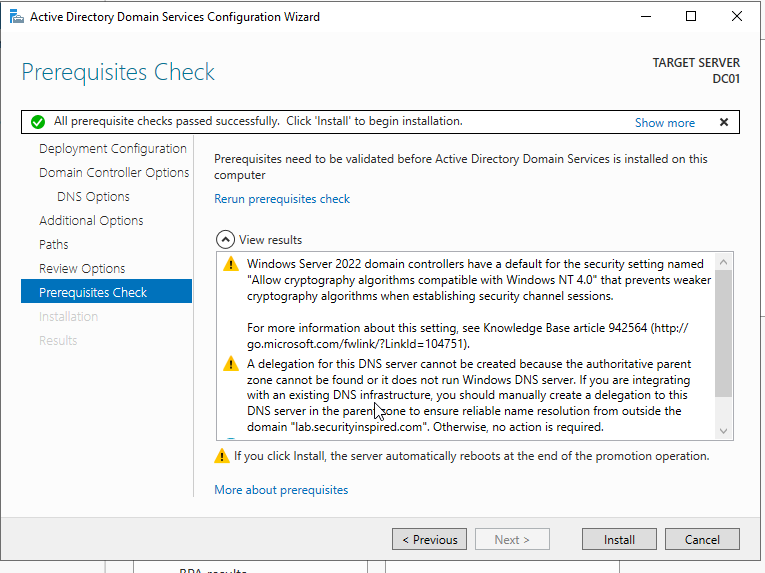
All checks passed. After installation, the server restarted automatically and came back up as a Domain Controller, now requiring domain credentials to log in.
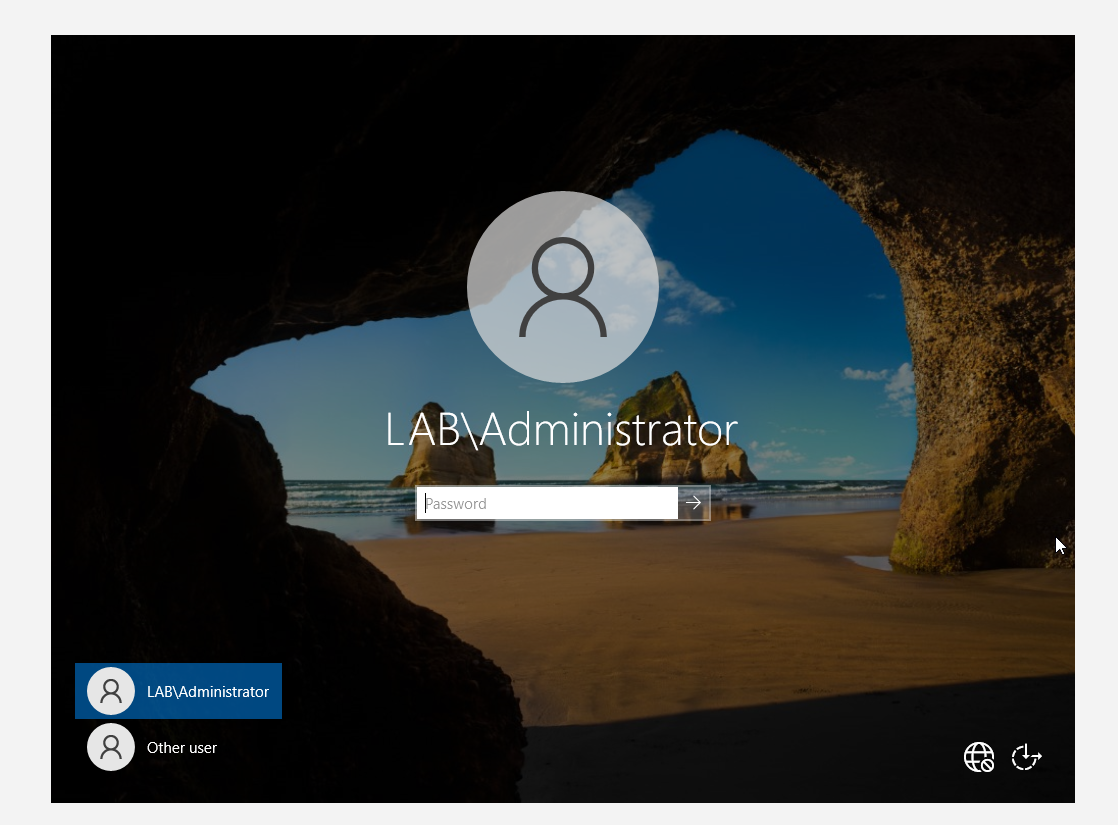
The LAB\ prefix on the login screen confirms the promotion worked. The server is no longer a standalone machine — it is the authority for the lab.securityinspired.com domain.
Step 3: Designing the OU Structure
Before creating a single user, the organisational structure needed to be in place. This is a decision that matters beyond aesthetics. Organisational Units in Active Directory are not just folders — they are the containers that Group Policy Objects get applied to. Building the structure first means users and computers land in the right place from the start, rather than needing to be moved later.
For this lab, the domain represents a fictional company called Security Inspired. The top-level OU is named after the company, with three department OUs underneath it:
- Finance
- HR
- IT
This reflects the kind of structure you would find in a real small-to-medium organisation, where departments have their own policy requirements and access needs. A Finance user should not have the same permissions as an IT Admin, and building the structure to reflect that from the beginning makes the lab more realistic to work with.
Step 4: Creating Users
With the OU structure in place, I created two users per department — six users in total.
The naming convention for logon names follows a department prefix pattern: hr.user1, hr.user2, finance.user1, and so on. This makes it immediately clear which department a user belongs to without having to open their properties.
For the IT department specifically, the two accounts reflect a realistic split in responsibilities:
- IT Support — a standard helpdesk-level account
- IT Admin — an account with elevated privileges for administrative tasks
That distinction matters for how access and group membership will be configured in later weeks.
Here is the user creation for John Doe in the Finance OU:
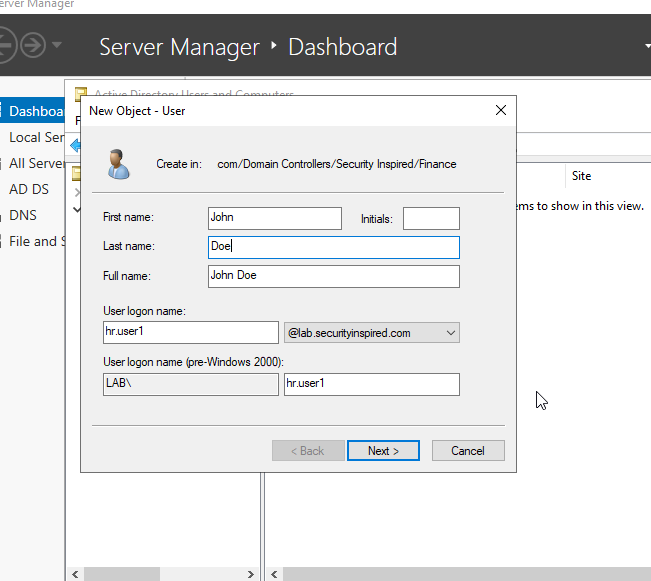

A deliberate decision: unchecking “User must change password at next logon”
By default, Active Directory requires new users to change their password on first login. For a production environment, that is the correct behaviour — it ensures each user sets a password only they know. In this lab at this stage, however, enabling it would introduce a potential point of failure that has nothing to do with what is being learned.
The isolated internal network has no internet connectivity and no external DNS resolution. A password change process that relies on reaching a domain controller under those conditions can fail in ways that look like DNS errors, not password errors. Troubleshooting that at this point would pull focus away from the Active Directory setup entirely.
The decision was to uncheck the option for now and focus on getting the directory built correctly. Password policies and forced resets will be addressed in a later week when the environment is ready for it. In a real onboarding scenario, a new user would always be required to set their own password — this is a lab-specific shortcut made with full awareness of why it exists.
Step 5: Creating Security Groups
Security groups in Active Directory control access to resources. Even at this early stage, creating them reflects how a real environment is structured — permissions get assigned to groups, not to individual users.
Three groups were created, one per department:
HR_GROUPFinance_GroupIT_GROUP
Users were then added to their respective groups. This means that when file shares, policies, or application access gets configured in later weeks, the groups are already in place and membership is already set. It is a small step now that avoids a significant amount of rework later.
Step 6: Joining the Client to the Domain
With the domain built and users created, the final step was joining WIN11-CLIENT01 to lab.securityinspired.com.
Before attempting the join, I confirmed the client could reach the domain controller by pinging the domain name directly. This does more than confirm connectivity — it confirms that DNS is resolving correctly, which is a prerequisite for a successful domain join.
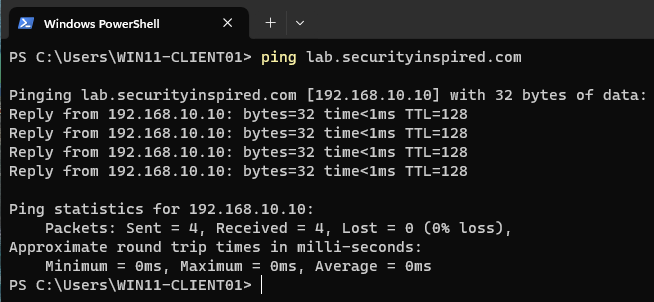
The domain name resolved to 192.168.10.10 — the correct address for DC01. DNS is working.
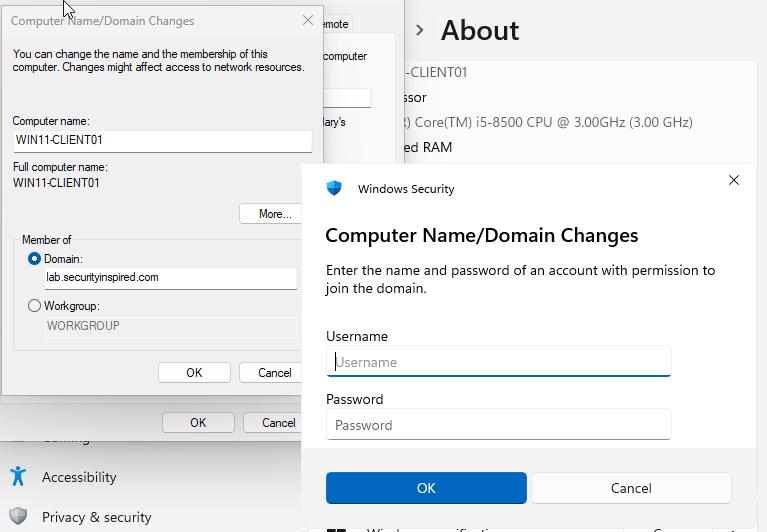
On the client, I opened System Properties, selected Domain under the Computer Name tab, and entered lab.securityinspired.com. The credential prompt asked for an account with permission to join the domain.
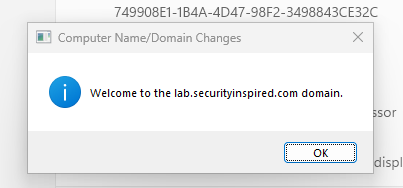
After authenticating, the confirmation appeared:
Validation Checks
A working setup and a verified setup are two different things. Here is what was confirmed after the build was complete.
VM communication — Both machines could ping each other and the client could resolve the domain name by DNS, not just by IP.
Static IP and DNS — DC01 remained at 192.168.10.10. The client’s DNS server was pointed at DC01, which is what allowed the domain join to work.
Domain login — After the client restarted and joined the domain, I logged in using the domain user account for John Doe.

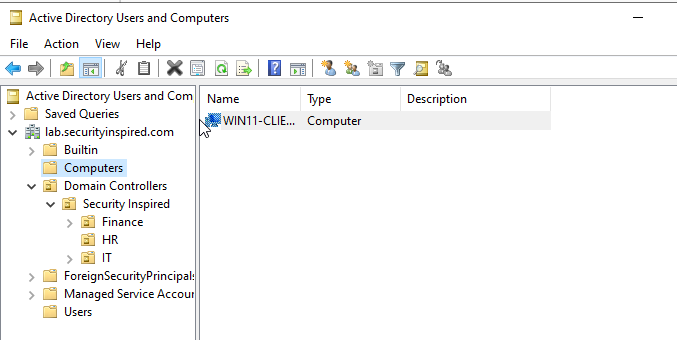
Client appearing in Active Directory — After the domain join, WIN11-CLIENT01 appeared in the Computers container in Active Directory Users and Computers. The OU structure — Security Inspired with Finance, HR, and IT beneath it — was also visible and correct.
Every check passed. The domain is active, users exist in the right OUs, security groups are in place, and the client is joined and verified.
What Week 2 Showed
Week 1 was about troubleshooting an unexpected problem. Week 2 was about building something deliberately. The difference is worth noting — not every week in IT is about fixing something broken. Some of the most important work is the upfront design that prevents problems from appearing later.
Getting the OU structure right before creating users, creating security groups before they are needed, confirming DNS resolution before attempting a domain join — these are the kinds of decisions that make a lab feel like a real environment rather than a series of isolated exercises.
What Is Coming in Week 3
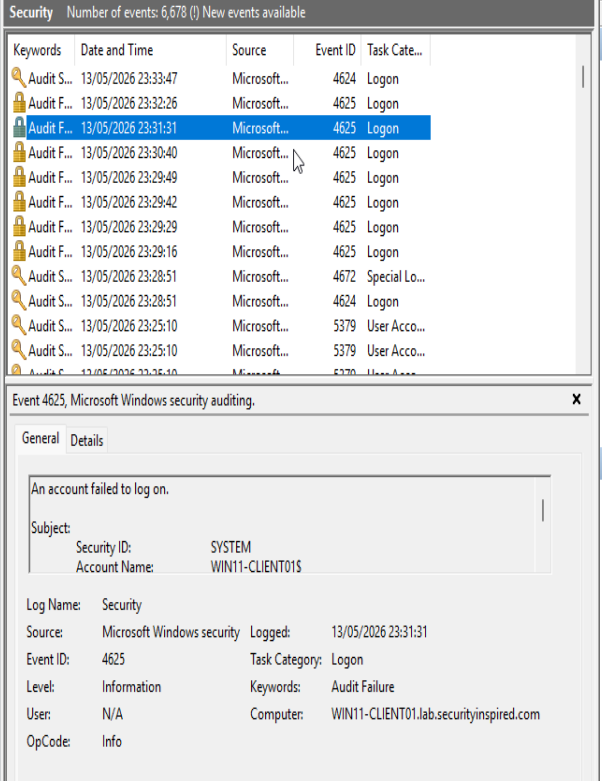
Week 3 shifts into troubleshooting mode. With a working Active Directory environment in place, the next step is to deliberately break it — misconfiguring DNS, locking out accounts, introducing login failures — and then diagnose and resolve each issue using Event Viewer and command-line tools.
The lab is there to be broken. That is what it is for.
Following along with the series? Each week builds on the last — if you are starting here, Week 1 covers the initial lab setup and the network issue that had to be resolved before any of this was possible.